Last updated: August 2026. Part 3 of our Campaign Manager 360 series — written from real trafficking work, not a rehash of Google’s help docs.
Impressions and clicks tell you an ad ran.
They don’t tell you whether it worked.
Floodlight is the piece of Campaign Manager 360 that closes that gap. It tracks what a user does after they view or click your ad — a purchase, a signup, a page visit — and ties that action back to the campaign that drove it.
This post walks through setting it up end to end, using the same Sports Gear account from earlier posts in this series.
What Is Floodlight, Exactly?
Floodlight tags allow you to track events after a user views or clicks on your ads. Those insights show which campaigns are most effective at driving the actions you actually want — a purchase, not just a visit.
Without Floodlight, CM360 can tell you an ad served a million impressions. With it, CM360 can tell you which 4,000 of those impressions turned into sales, and which placement, creative, or audience segment drove them.
It’s also the engine behind audience lists — the remarketing-style targeting we covered in the previous post in this series depends entirely on Floodlight data existing first.
Preparing for Ad Ops Interview. Download Our Real CM360 Interview Questions & Answer PDF That Can Get You Hired.
Step 1: Set Up Floodlight Tracking
In this example, you’re working on a running apparel campaign for Sports Gear, appearing on the adventure news site SportsFun.com. The goal: clear out past-season running apparel ahead of new inventory.
- Sign in to Google Marketing Platform. From Campaign Manager 360, select Trafficking.
- Select All advertisers, and use the search bar to find the advertiser you want to set up Floodlight for — at the parent advertiser level.
- Select the correct advertiser (in this case, “Sports Gear”).
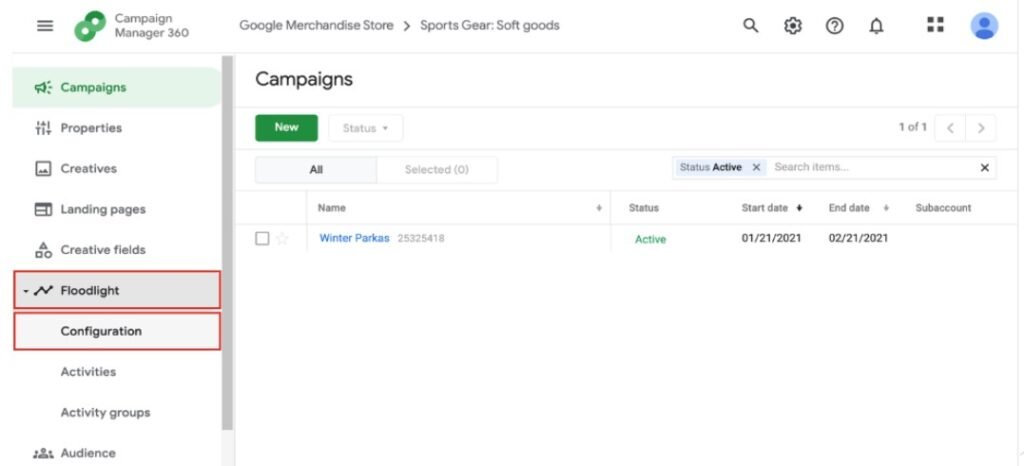
- Select Floodlight → Configuration.
5. Under Lookback windows, enter the number of days you want counted for clicks and impressions — commonly 30 days for clicks, 14 to 90 days for impressions, depending on your typical sales cycle.
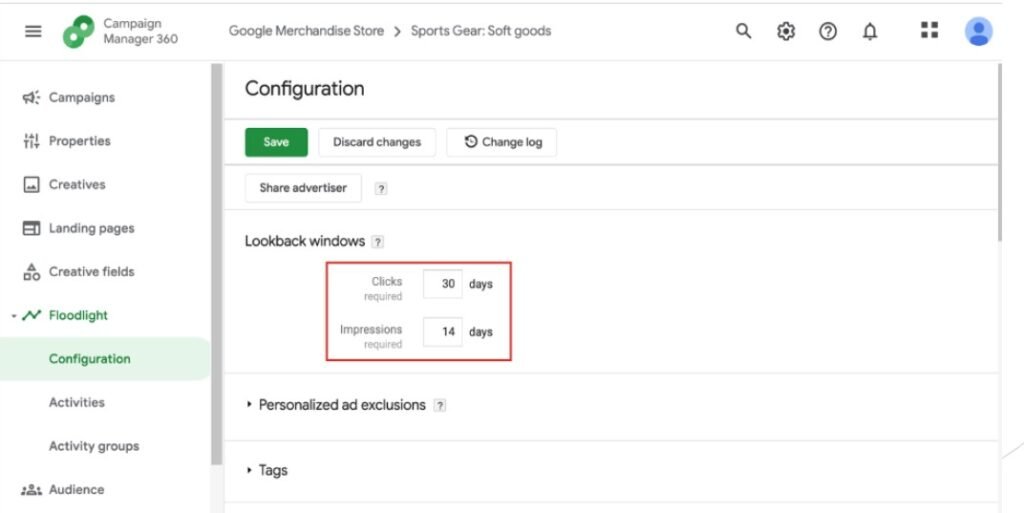
Lookback windows matter more than they seem. Set them too short, and you’ll undercount conversions that happen a few weeks after someone saw your ad. Set them too long, and you risk crediting campaigns for actions that had nothing to do with them.
Step 2: Create a Floodlight Activity Group
Before you can create an individual Floodlight activity, you need somewhere to organize it. That’s what activity groups are for — they let you manage related activities together and report at the group level.
- From the selected advertiser, go to Floodlight → Activity groups.
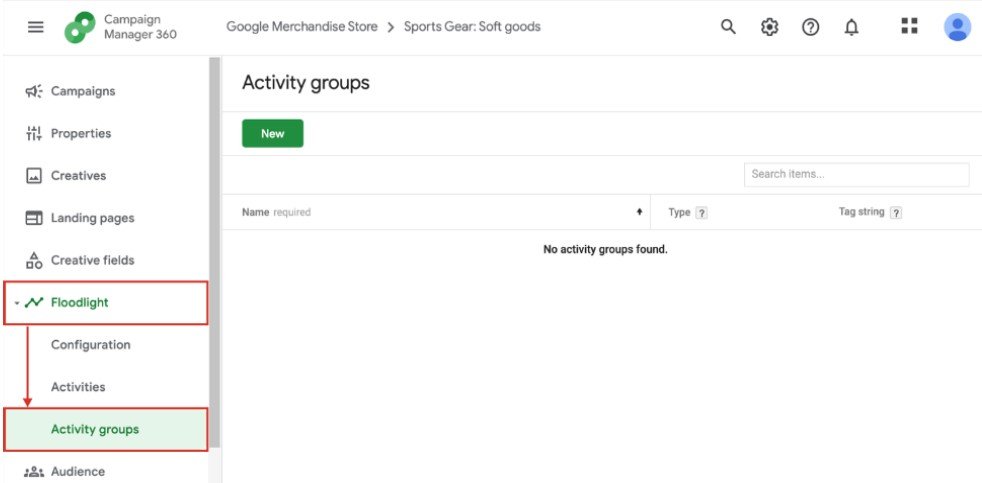
2. Select New.
3. In the Name field, enter a clear name — “Winter Parkas,” for example.
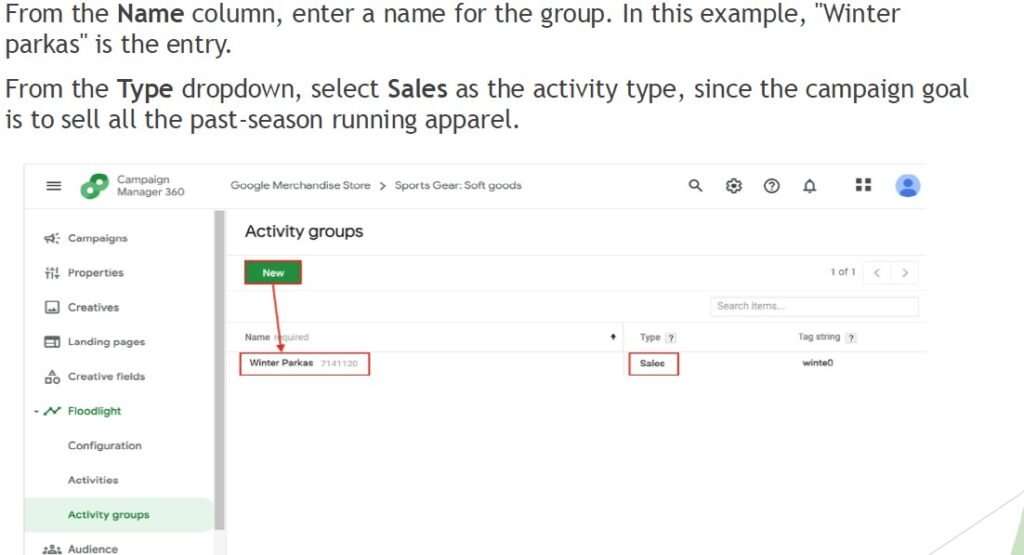
4. From the Type dropdown, select the activity type. For a campaign focused on driving sales, that’s Sales.
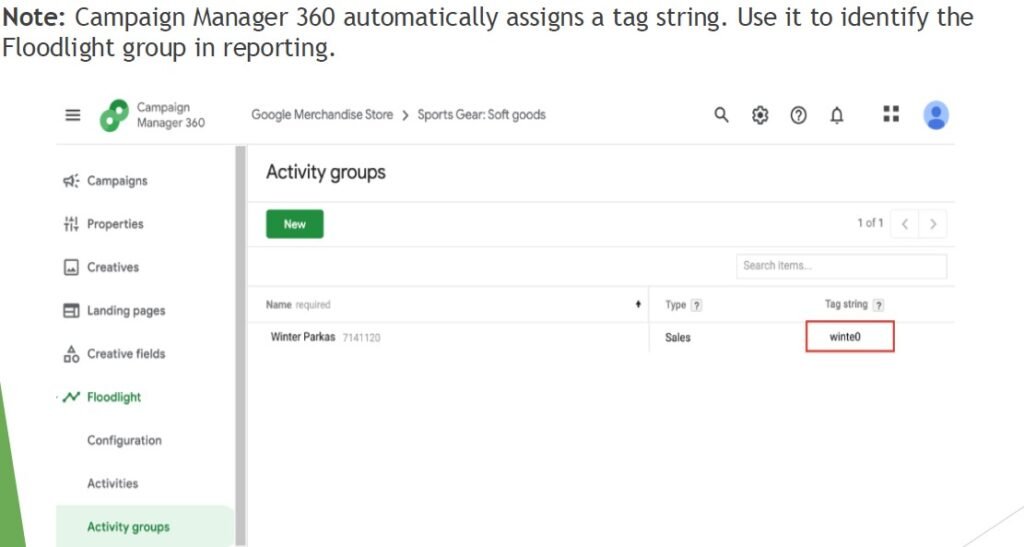
CM360 automatically assigns a tag string to the new group — a short code you’ll use to identify it later in reporting. Take note of it.
Step 3: Create the Floodlight Activity
This is the actual tag that fires on your site.
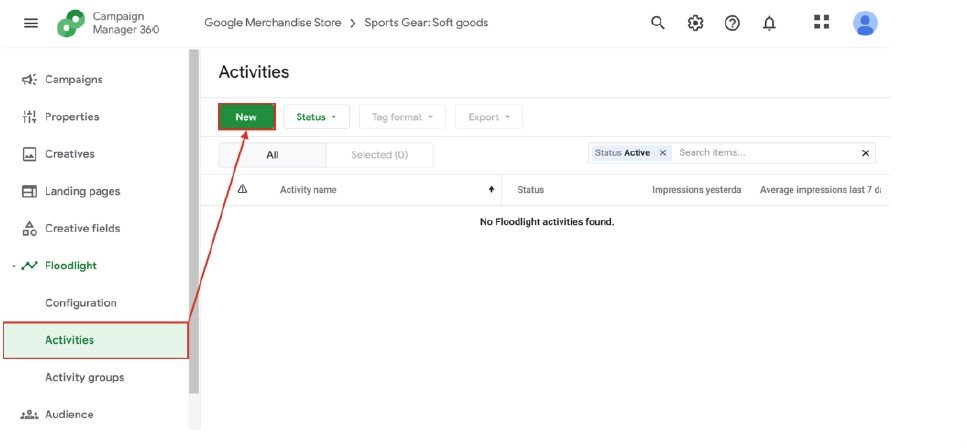
- Open the Activities tab and select New.
2. Under Identification, enter a Name — “Winter parka product info,” for example.
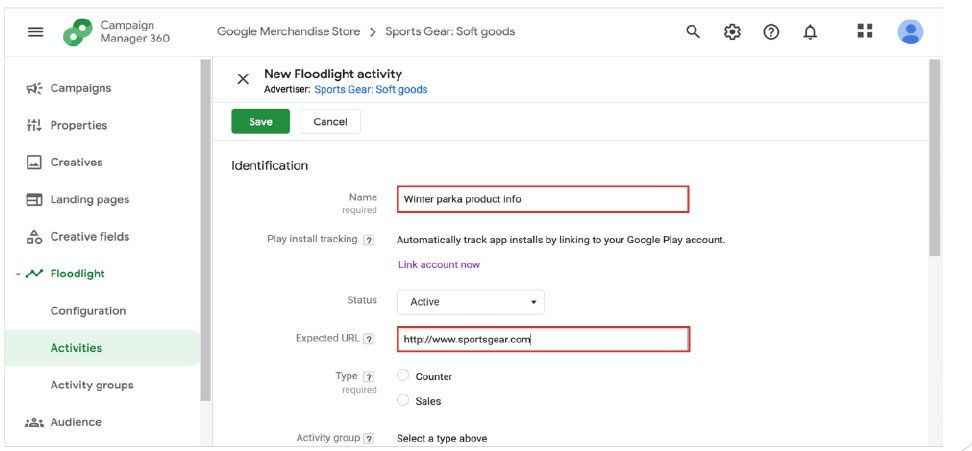
3. In the Expected URL field, enter the page where this activity should fire — typically the client’s website.
4. For Type, choose Counter or Sales.
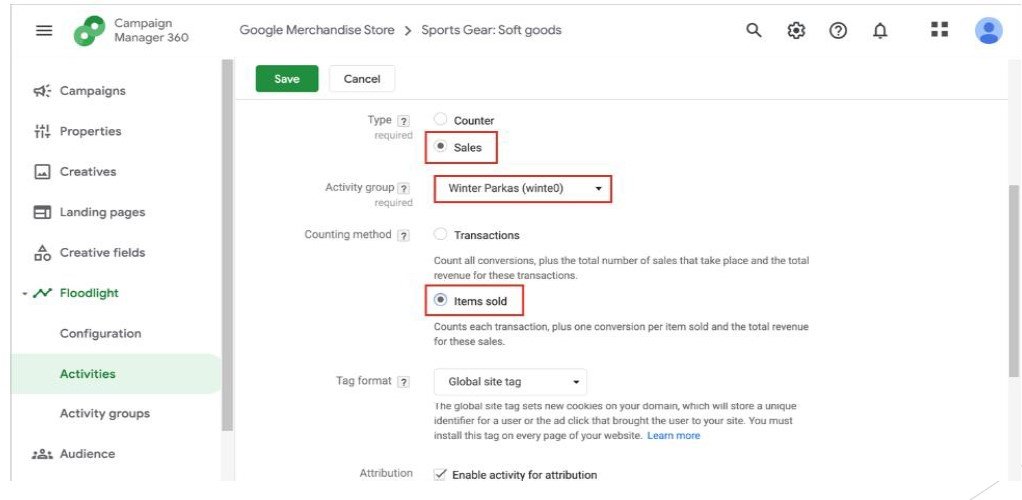
5. From the Activity group dropdown, select the group you just created.
6. For Counting method, choose how conversions should be counted.
Counter vs. Sales: What’s the Difference?
Counter activities simply count how often an action happens — a page visit, a form submission, an app open. No revenue attached, just a count.
Sales activities track actual transactions, and can include revenue data. Within Sales, you’ll also choose a counting method: Transactions counts each checkout once, plus total revenue for that transaction. Items sold counts each transaction, plus one conversion per individual item sold, plus revenue for those items — useful when a single order might contain several products you want counted separately.
Use Counter for anything that isn’t a direct sale — newsletter signups, brochure downloads, video plays. Use Sales anywhere revenue is the point.
Tag Format and Attribution
For Tag format, select Global site tag. This sets a new cookie on your domain that stores a unique identifier for the user or the ad click that brought them to your site — you’ll need to install this tag on every relevant page.
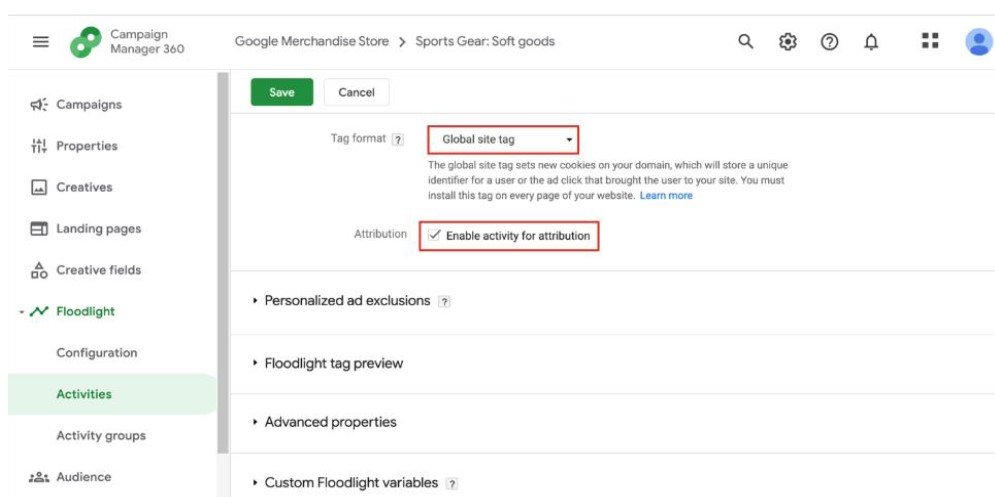
If this particular Floodlight activity isn’t meant to report on conversions, uncheck Enable activity for attribution. Otherwise, leave it checked so the activity feeds your attribution reporting.
Custom Floodlight Variables
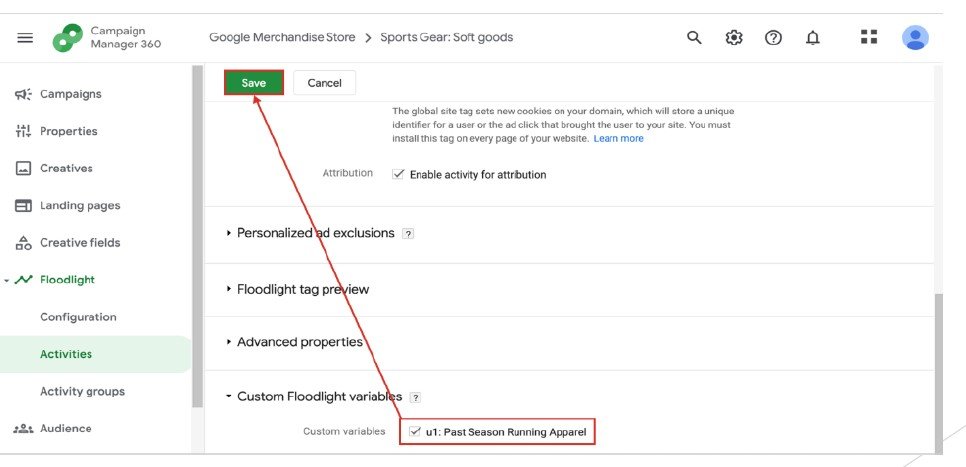
Want to show a client the impact of a campaign on one specific product line — not just overall sales? Expand Custom Floodlight variables and select the relevant variable.
In our example, that means checking the box for “Past Season Running Apparel” — so this Floodlight activity reports specifically on that segment, not Sports Gear’s sales as a whole. Select Save once you’re done.
Step 4: Export and Deploy the Tag
Select the line item for the activity you just created, then select Export and choose a file type — Text or Excel.
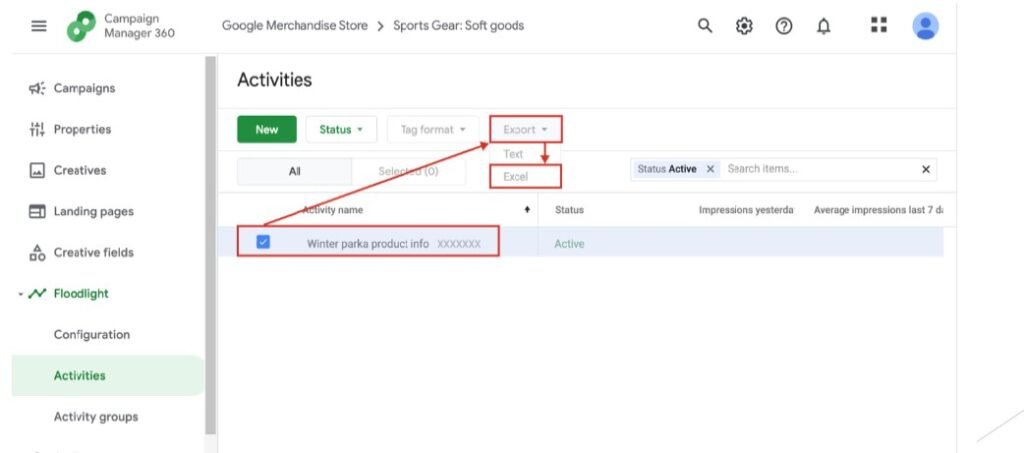
That file is what you’d share with a web developer, or send directly to a publisher like SportsFun.com, so the tag gets implemented on the site.
Once it’s live, the tag starts firing — and every downstream report, audience list, and attribution model that touches this activity group starts working with real data.
Frequently Asked Questions
Counter activities track how often an action happens, with no revenue attached — useful for signups, downloads, or visits. Sales activities track actual transactions and can report revenue, using either the Transactions or Items sold counting method.
A lookback window is the number of days after a click or impression during which a conversion can still be credited to that ad. It’s set at the advertiser level under Floodlight → Configuration, separately for clicks and impressions.
Custom Floodlight variables let you tag conversions with extra detail — a specific product line, promo code, or customer segment — so you can report on that slice of performance separately from your overall conversion numbers.
Yes. Activity groups organize your Floodlight activities and let you manage and report on them collectively, so CM360 requires one to exist before you can assign a new activity to it.
What’s Next
With Floodlight live, you’re now capturing the data that makes reporting worth looking at. The platform itself keeps changing too — worth bookmarking Google’s list of upcoming Campaign Manager 360 updates if Floodlight is central to how you report on client performance.
In the final post of this series, we’ll cover CM360’s three core report types — Standard, Floodlight, and Reach — and build a scheduled report from scratch.
Comments are closed.